 Pin This
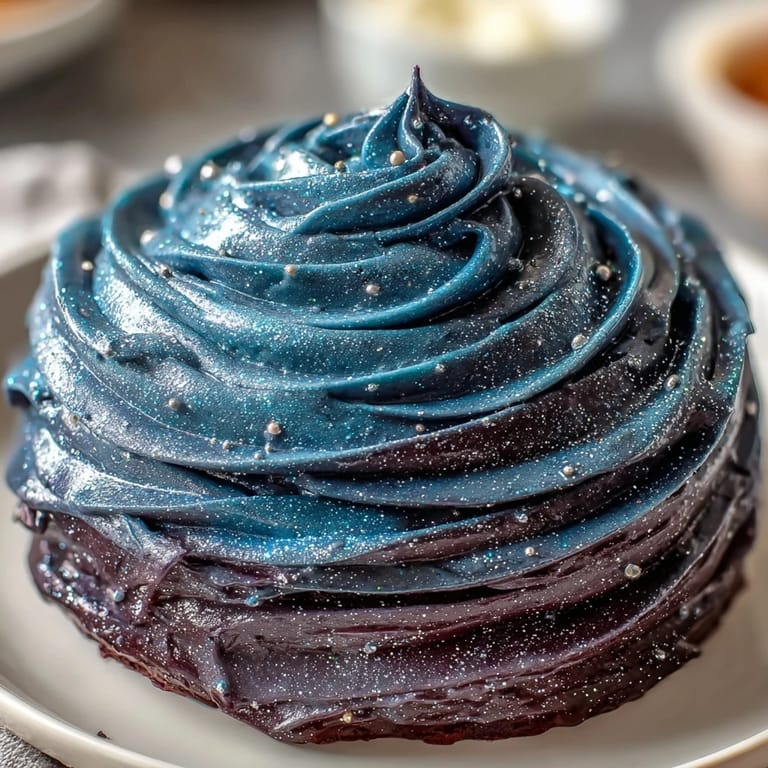
 My friend turned twenty-eight on a Tuesday in March, and she mentioned offhandedly that she'd always wanted a cake that looked like the night sky. I'd never made anything so deliberately fancy before, but something about creating an edible galaxy felt right for someone born under Pisces. Standing in my kitchen at midnight the night before her party, surrounded by bottles of gel food coloring and edible glitter catching the light, I realized this cake was less about perfection and more about showing up for someone with something shimmering and strange and utterly hers.
When I finally brought that cake to the party, watching her face light up while singing happened around it felt like the most worthwhile kitchen project I'd done in years. Her sister asked if I'd gone to culinary school, and I laughed because I'd learned everything by making mistakes at one in the morning, frosting getting stuck under my fingernails, Spotify on shuffle.
Ingredients
- All-purpose flour (2 ½ cups): The foundation of a tender crumb—make sure it's measured correctly or your cake will turn dense and stubborn.
- Baking powder (2 ½ tsp): This is your lift, so check that yours hasn't been sitting in the back of your cabinet for three years.
- Salt (½ tsp): A tiny amount that makes everything taste more like itself, not salty.
- Unsalted butter (1 cup for cake, 1 ½ cups for frosting): Room temperature is non-negotiable—cold butter won't cream properly, and your batter will break.
- Granulated sugar (2 cups): Beating this with butter for a few minutes creates tiny air pockets that make the cake light.
- Eggs (4 large, room temperature): Temperature matters because cold eggs don't blend smoothly into the batter.
- Pure vanilla extract (1 tbsp for cake, 2 tsp for frosting): The real stuff tastes like vanilla; the imitation tastes like regret.
- Whole milk (1 cup for cake, ¼ cup for frosting, room temperature): Alternating flour and milk keeps the batter balanced and prevents overmixing.
- Powdered sugar (5 cups, sifted): Sifting removes lumps that would make your frosting grainy and disappointing.
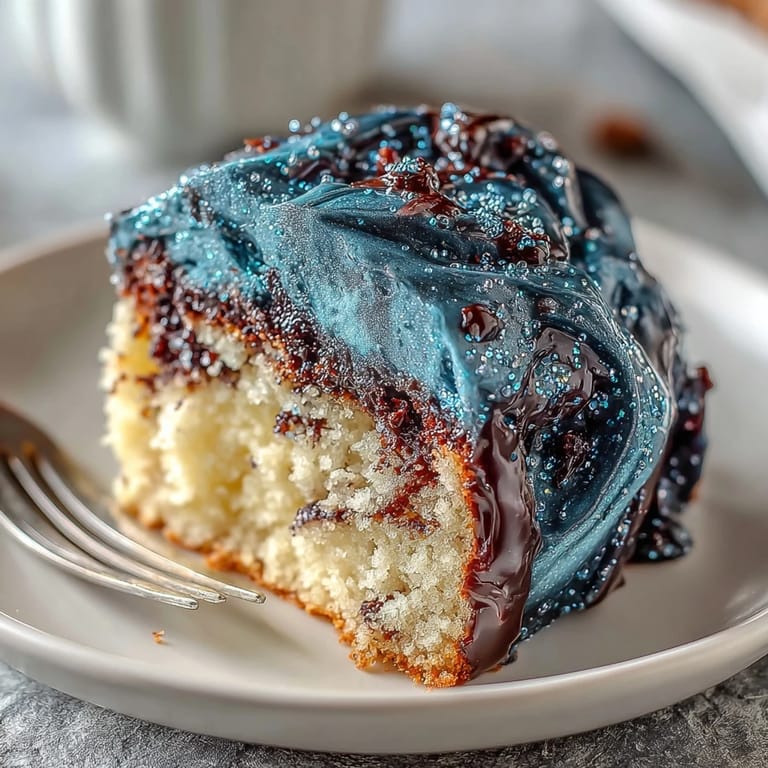
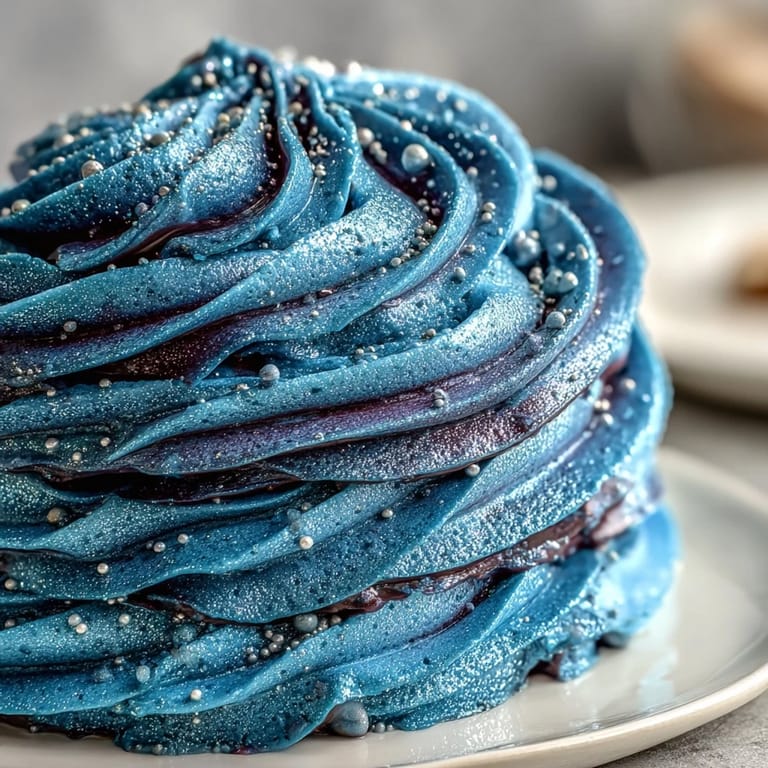
- Gel food coloring (navy blue, purple, black, teal): Gel colors are more concentrated than liquid, so you won't thin out your frosting the way liquid dyes would.
- Edible glitter (silver, blue, or iridescent): The magic that makes this cake feel like you caught starlight in buttercream.
Tired of Takeout? 🥡
Get 10 meals you can make faster than delivery arrives. Seriously.
One email. No spam. Unsubscribe anytime.
Instructions
- Prepare Your Stage:
- Preheat the oven to 350°F and grease three 8-inch round pans with parchment paper lining the bottoms. This prevents sticking and makes turning out the layers so much easier than it sounds.
- Mix Your Dry Ingredients:
- Whisk flour, baking powder, and salt together in a medium bowl—this distributes the leavening evenly. Set it aside and pretend you have your act together.
- Cream the Butter and Sugar:
- Beat room-temperature butter and sugar for 3–4 minutes until the mixture looks pale and fluffy, like clouds. This is where air enters the cake, so don't rush.
- Add the Eggs Carefully:
- Drop in one egg at a time, beating well after each addition so the mixture stays smooth and doesn't curdle. Add vanilla extract last, beating until everything is unified.
- Alternate Wet and Dry (The Important Part):
- Start with about a third of the flour mixture, beat it in, then add half the milk. Repeat with another third of flour, then the rest of the milk, ending with the final third of flour. Overmixing at this stage makes tough cake, so stop as soon as everything is combined.
- Divide and Bake:
- Split the batter evenly among the three prepared pans and smooth the tops. Bake for 25–30 minutes until a toothpick inserted in the center comes out clean—the tops should feel springy to the touch.
- Cool Properly:
- Let the cakes rest in their pans for 10 minutes, then turn them out onto wire racks to cool completely. This step matters because frosting warm cake turns into a greasy mess.
- Make the Galaxy Buttercream:
- Beat room-temperature butter until creamy, then gradually add sifted powdered sugar, milk, and vanilla, beating until smooth and fluffy. This should take about 5 minutes and feel like whipping clouds.
- Create Your Color Palette:
- Divide the buttercream into four bowls and tint each with gel coloring—navy blue, purple, teal, and black. Use a toothpick to add color gradually so you don't overshoot and end up with sad brown buttercream.
- Layer and Swirl:
- Place the first cake layer on a serving plate, then spoon alternating colors of buttercream onto the top, creating a loose pattern. Use an offset spatula to swirl gently, letting colors blur into each other like a real galaxy. Repeat with the second and third layers, then frost the sides with the same technique.
- Make It Shine:
- Sprinkle edible glitter generously over the frosted cake, pressing some gently so it adheres. For extra shimmer, brush the cake lightly with clear vodka using a food-safe paintbrush before adding glitter—the alcohol evaporates and leaves the glitter stuck.
- Chill and Set:
- Refrigerate for at least 30 minutes so the frosting firms up and the design sets. This also makes slicing cleaner and your cake look more intentional.
 Pin This
 The moment I realized this cake had become more than just dessert was when my friend took a photo of it and posted it with a caption about feeling seen and celebrated. Something about effort translated into edible stardust had moved her in a way that surprised us both.
Why Room Temperature Matters So Much
I learned this the hard way by using butter straight from the fridge and spending an extra twenty minutes wondering why my batter looked separated and sad. Room-temperature ingredients cream together into a smooth, homogeneous mixture that traps air and creates lift. Cold eggs won't emulsify into the butter, and cold milk makes the whole thing seize up and look curdled. Patience matters here—pull everything out thirty minutes before you start baking and your life becomes easier.
The Glitter Question Everyone Asks
Yes, edible glitter actually tastes like nothing, which feels like a betrayal until you realize that's the point. It exists purely to catch light and make people feel like they're eating something magical. Buy the kind marked specifically as edible—craft glitter is not meant for mouths, and I learned this by reading the fine print on the third brand I picked up.
Flavor Variations and Storage Secrets
This cake stays moist for three days covered loosely on the counter, and even better for five days if you refrigerate it. The vanilla sponge is a blank canvas—substitute half a teaspoon of almond extract for a different flavor direction, or add the zest of one lemon for brightness. You can make the cake layers a day ahead and frosting the morning of, which splits the pressure and gives you more control over the final design.
- For a gluten-free version, swap the all-purpose flour for a 1:1 gluten-free blend and add ¼ teaspoon of xanthan gum to keep the crumb tender.
- Pair slices with sparkling Moscato, lemonade, or even strong black coffee to cut through the sweetness.
- If you're decorating with fondant Pisces symbols or stars, make them at least an hour ahead so they have time to dry and won't smudge.
 Pin This
 This cake proves that the most memorable food is the kind that shows someone you were willing to be a little ambitious on their behalf. Make it for someone who needs to feel like the stars were arranged just for them.
Recipe FAQs
- → How do I achieve vibrant galaxy colors in the buttercream?
Use gel food coloring in navy blue, purple, teal, and black. Gel colors provide deep, concentrated shades without thinning the buttercream.
- → Can I prepare the cake layers in advance?
Yes, you can bake the vanilla sponge layers a day ahead and store them wrapped tightly in the refrigerator to maintain freshness.
- → What is the best way to apply edible glitter evenly?
Sprinkle edible glitter gently over the finished cake, or use a food-safe paintbrush to brush alcohol lightly on the surface first for better adhesion.
- → How do I create the swirling galaxy effect on the cake?
Place alternating spoonfuls of the different colored buttercreams on the layers and sides, then gently swirl together with a spatula until the desired pattern forms.
- → Are there substitutions for vanilla extract?
Almond extract can be used for a flavor twist, offering a nutty aroma that complements the vanilla sponge.
- → What tools are essential for assembling this layered cake?
An electric mixer for buttercream, offset spatula for swirling colors, parchment paper for baking, and 8-inch cake pans for uniform layers are key tools.