Pin This
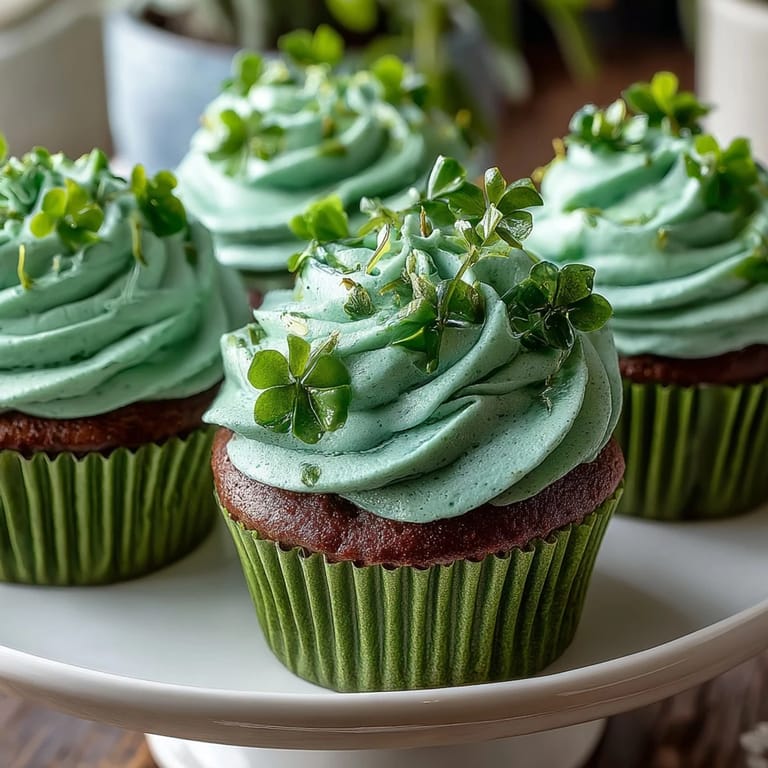
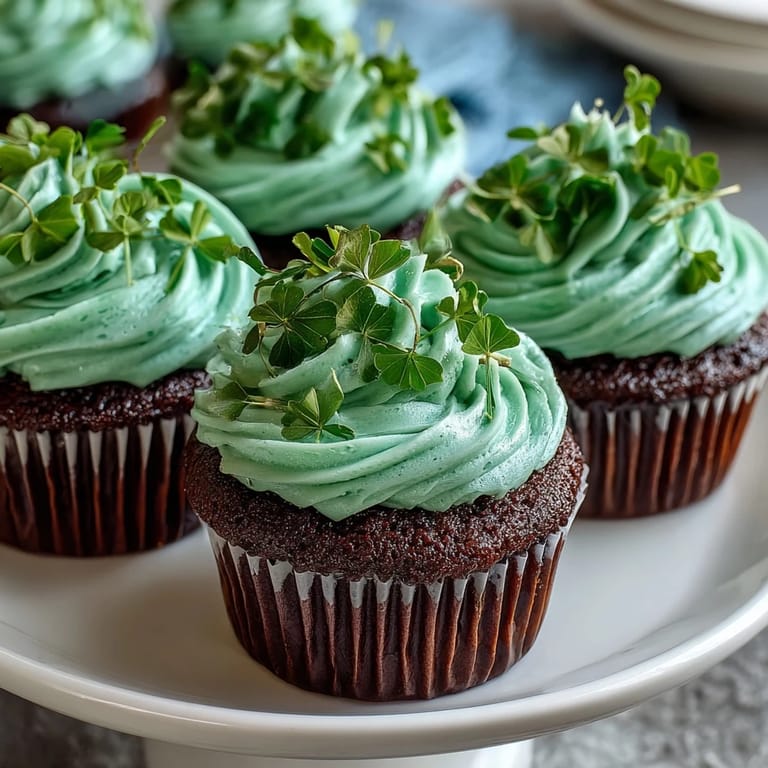
 My kitchen smelled like chocolate and vinegar the first time I attempted these green velvet cupcakes, which honestly seemed like an odd combination until that first bite proved otherwise. I'd been scrolling through St. Patrick's Day ideas at midnight, half-asleep, when I stumbled on the concept of green velvet—basically the festive cousin of red velvet that actually tastes like something special. The moist crumb, that subtle cocoa whisper, and the way the green color transforms from batter to finished cake felt like edible magic. What started as a last-minute party idea became my go-to March celebration treat, and now I find myself making extra batches just to have them on hand.
I remember pulling these from the oven for a St. Patrick's Day potluck where someone had already brought three different potato dishes, and watching people's faces light up when they realized dessert was actually interesting. One guest asked if I'd hired a bakery, which felt ridiculous given that I'd mixed everything in about ten minutes flat. That moment taught me that impressive doesn't always require complicated, and sometimes the best dishes are the ones that seem fancier than they actually are.
Ingredients
- All-purpose flour (1 1/4 cups): This is your structure—measure by spooning into the cup rather than scooping directly from the bag, or you'll end up with too much and dense cupcakes that nobody wants.
- Granulated sugar (3/4 cup): Sweetness comes here, but it also helps create that tender crumb that makes people close their eyes on the first bite.
- Unsweetened cocoa powder (1/4 cup): This is the secret that makes green velvet different from regular cake—it's subtle but absolutely essential, giving an earthy depth without making them taste like chocolate.
- Baking soda (1/2 teaspoon): The vinegar and baking soda react together to create lift and that characteristic tender structure of velvet cakes.
- Salt (1/4 teaspoon): Just a tiny pinch that amplifies flavor without announcing itself.
- Buttermilk (2/3 cup): Cold buttermilk straight from the fridge will seize everything up, so bring it to room temperature first or the batter will be lumpy and sad.
- Vegetable oil (1/2 cup): Oil keeps these cupcakes tender and moist in a way butter alone never could, so don't swap this out.
- Eggs (2 large): Room temperature eggs incorporate smoothly without creating overmixed batter, which is the enemy of tender crumb.
- Vanilla extract (1 teaspoon): Pure vanilla is worth the slight splurge here because it actually tastes like something.
- Distilled white vinegar (1 teaspoon): This is the velvet-making magic—it reacts with the baking soda and creates that signature tender texture.
- Green gel food coloring (1 tablespoon): Gel coloring creates vibrant color without diluting the batter like liquid coloring does, which would make them dense.
- Cream cheese (8 oz): Softened properly, this becomes the creamy base of frosting that people remember long after they finish eating.
- Unsalted butter (1/4 cup): Softened butter mixed with cream cheese creates a frosting that's spreadable but still holds shape.
- Powdered sugar (2 cups): Sifted powdered sugar prevents lumps and ensures silky frosting instead of a grainy mess.
- Vanilla extract (1 teaspoon for frosting): A touch of vanilla in frosting bridges the gap between the cake's cocoa notes and the cream cheese tang.
- Green sprinkles or shamrock candies (optional): These are the finishing touch that makes them look festive without requiring any actual decorating skill.
Tired of Takeout? 🥡
Get 10 meals you can make faster than delivery arrives. Seriously.
One email. No spam. Unsubscribe anytime.
Instructions
- Heat your oven and prepare:
- Preheat to 350°F and line your muffin tin with liners—this temperature is important because it's hot enough to set the cupcakes quickly without browning the tops too much. You want them baked through but still incredibly moist inside.
- Mix your dry ingredients:
- Whisk together flour, sugar, cocoa, baking soda, and salt in a large bowl, making sure the cocoa powder doesn't have any lumps hiding in there. This creates an even distribution of leavening and cocoa flavor throughout.
- Combine the wet mixture:
- In a separate bowl, whisk buttermilk, oil, eggs, vanilla, vinegar, and green food coloring until everything is completely blended and the color is uniform. The vinegar will make the batter smell sharp and strange, but trust the process—it's creating magic.
- Bring it together gently:
- Pour wet into dry and mix just until combined, stopping as soon as you don't see streaks of flour anymore. Overmixing develops gluten, which toughens the cupcakes and ruins the tender crumb you're working toward.
- Fill the liners:
- Divide batter evenly, filling each liner about two-thirds full—not to the brim, because they'll rise as they bake and you want them to dome slightly without overflowing. This usually takes about three tablespoons per cupcake if you're being precise, or you can just eyeball it and adjust.
- Bake until just done:
- Bake for 16 to 18 minutes—the exact time depends on your oven, so start checking at 16 minutes with a toothpick in the center. It should come out clean or with just a tiny crumb or two, because overbaked cupcakes are dry cupcakes.
- Cool properly:
- Let them sit in the tin for five minutes so they firm up enough to handle, then transfer to a wire rack to cool completely. Frosting warm cupcakes is a disaster that melts everything into a puddle.
- Make the frosting:
- Beat softened cream cheese and butter until smooth and fluffy—this takes about two minutes and creates a light, airy base. Gradually add powdered sugar, then vanilla, and beat until it looks like clouds in a bowl.
- Frost when completely cool:
- Spread or pipe frosting generously onto completely cool cupcakes, then add sprinkles or candies if you're feeling festive. The frosting will be easier to work with if it's chilled for 15 minutes beforehand.
 Pin This
 There's something genuinely sweet about seeing someone bite into one of these and realize that St. Patrick's Day dessert doesn't have to be boring green cookies or chocolate-covered everything. These cupcakes became the thing people actually request now, which feels like a small victory in the kitchen.
The Cocoa Secret
The cocoa powder in these cupcakes does something surprising—it doesn't make them taste chocolatey, it makes them taste complex and almost sophisticated in a way plain vanilla cupcakes can't quite achieve. That small quarter-cup of unsweetened cocoa is the difference between a cupcake people politely eat and one people come back to the table asking about. I learned this by accident when I ran out of cocoa once and tried to skip it, only to end up with green cupcakes that tasted aggressively like birthday cake frosting.
The Vinegar and Soda Magic
When you combine vinegar and baking soda, they create a chemical reaction that produces carbon dioxide bubbles, which creates lift in the batter and contributes to that signature velvet texture—tender, slightly crumbly, almost delicate. The vinegar also reacts with the cocoa and the buttermilk to create a subtly tangy undertone that balances the sweetness. I remember being confused about why a vinegar-based cupcake wasn't supposed to taste sour until I actually made them and understood that it just adds depth, not flavor.
Frosting and Flavor Pairing
Cream cheese frosting exists for a reason—it's the perfect counterbalance to the cocoa undertones and subtle sweetness of the cupcake, cutting through everything with a slight tang that makes you want another bite immediately. The vanilla in the frosting doesn't overpower; it just bridges the gap and helps everything feel cohesive. I learned that making frosting too sweet masks the actual flavors of the cake, so if you're tempted to add more sugar, resist the urge.
- Sift your powdered sugar before adding it to avoid any lumps that'll make frosting grainy.
- Let your cream cheese and butter come to genuine room temperature—cold blocks won't cream together properly.
- Taste the frosting before piping and adjust vanilla to your preference, since some vanilla extracts are stronger than others.
 Pin This
 These cupcakes have become my answer to the question of how to make St. Patrick's Day feel special without requiring complicated techniques or specialty ingredients. They're festive, they're reliable, and they genuinely taste better than they have any right to.
Recipe FAQs
- → What gives the cupcakes their green color?
The vibrant green hue comes from green gel food coloring added to the batter, providing a bright and festive appearance without thinning the mixture.
- → Can the frosting be made dairy-free?
Yes, substituting cream cheese and butter with plant-based alternatives creates a dairy-free frosting while maintaining its creamy texture.
- → How to ensure cupcakes stay moist?
Using buttermilk and vegetable oil in the batter helps retain moisture, resulting in tender, soft cupcakes.
- → What is the ideal baking temperature and time?
Bake the cupcakes at 350°F (175°C) for 16 to 18 minutes until a toothpick inserted comes out clean.
- → Are there any tips for decorating these cupcakes?
Decorate with green sprinkles or shamrock candies for a festive touch that enhances the St Patricks Day theme.